Accelerate your protein engineering. Download our free guide to cell display
A Technical Guide to Sorting Strategies in Surface Display
In any yeast or mammalian surface display campaign, the flow cytometer is your primary selection tool. However, simply collecting the "brightest" cells is a naive approach that often enriches for expression artifacts rather than the high-affinity binders you truly want. An effective screen relies on a dynamic, multi-round sorting strategy that applies progressive selective pressure to identify library members with the desired ligand binding phenotype.
9/4/20253 min read


The Foundation: Normalizing Binding to Expression
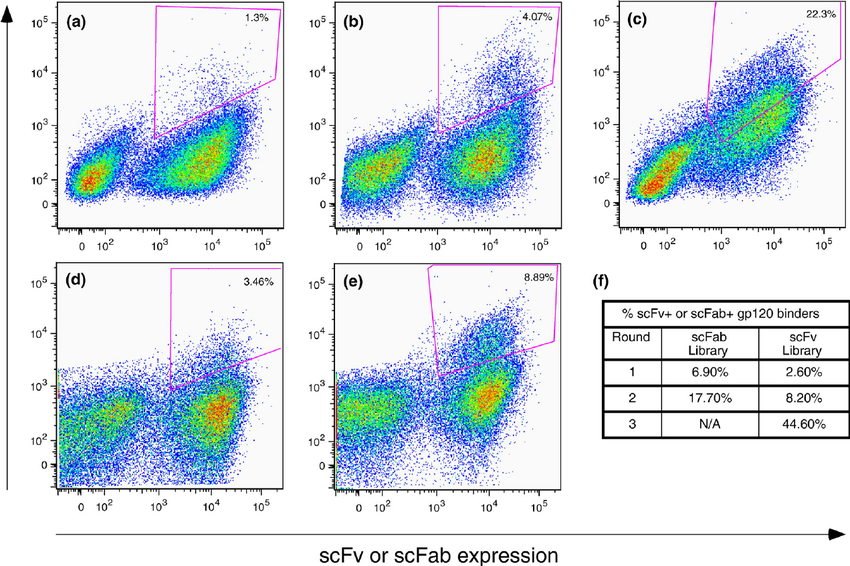
The most critical concept in yeast display and mammalian display cell sorting is that fluorescence intensity alone is not a reliable measure of binding affinity. A cell can appear bright because it displays many low-affinity proteins, while a cell with fewer, but higher-affinity, proteins might be dimmer.
To solve this, every sorting experiment should involve a two-color staining scheme:
Binding Signal (Y-axis): A fluorescently-labeled antigen or target molecule.
Expression Signal (X-axis): A fluorescently-labeled displayed antibody. Antibodies can be labelled using expression tag (e.g., c-myc, HA, Flag).
Plotting these against each other allows you to identify cells with the highest binding-to-expression ratio—the true measure of a protein's quality. Our goal is to isolate the population in the upper-left quadrant of the plot.
Phase 1: Early Rounds (Rounds 1-2) - Casting a Wide Net
The primary goal of the initial sorting rounds is not to find the single best clone, but to eliminate the vast majority of non-binders and enrich for any variant that shows specific binding. Applying excessive pressure too early can lead to the loss of potentially valuable, moderate-affinity clones.
Antigen/Ligand Concentration: Use a high, often saturating concentration of your labeled antigen (e.g., 100 nM or higher). This ensures that even weak binders are captured, giving them a chance to survive into the next round.
Gating Strategy: Employ a generous "trapezoid" or "diagonal" gate. Instead of collecting just the top 1-2%, aim to collect a broader population (e.g., 5-15%) that demonstrates a clear signal above the non-binding and single-labeled populations. This gate should reward any increase in binding signal, even if expression levels vary.
Phase 2: Mid-to-Late Rounds (Rounds 3+) - Applying the Pressure
Once the population is enriched for binders, the strategy shifts. Now, the goal is to create competition and apply stringent selective pressure to isolate only the highest-affinity variants.
Antigen Concentration: This is the most important variable to adjust. With each successive round, decrease the antigen concentration. Start by titrating the antigen against the enriched pool to determine its bulk EC50 (the concentration required for 50% maximal binding). In subsequent rounds, use concentrations at or, ideally, below this EC50. This forces the variants to compete; only those with high affinity will be able to bind the target efficiently at low concentrations.
Gating Strategy: The gate becomes progressively tighter and more focused on the top "tip" of the binding population. This "polygon" gate specifically targets the cells with the highest binding-to-expression ratio. As the rounds proceed, you might collect a smaller fraction of the population (e.g., 0.5-2%) that represents the truly elite binders.
Advanced Strategies for Specific Goals
Beyond simple affinity-based sorting, specific strategies can be used to select for more complex properties.
1. Off-Rate Ranking (Kinetic Selection)
For many applications, a slow dissociation rate (koff) is more important than a fast association rate. Off-rate ranking specifically selects for clones that bind the target most durably. This is a general workflow for identifying binders with a slow dissociation rate:
Incubate the cell library with a saturating concentration of labeled antigen and wash.
Add a large molar excess (e.g., 100x) of unlabeled, "competitor" antigen.
Incubate for a defined period (e.g., 30 minutes, 4 hours, or even 24 hours). The length of this incubation is the primary source of selective pressure.
Sort the cells that remain fluorescent. Only the clones with the slowest off-rates will retain the labeled antigen long enough to be collected.
2. Specificity and Counter-Screening
This strategy is essential for eliminating cross-reactivity to undesired molecules (e.g., a related protein family member).
Label the target of interest with one fluorophore (e.g., APC or PE, emitting in red).
Label the "counter-target" or undesired molecule with a different, non-overlapping fluorophore (e.g., FITC, emitting in green).
Incubate the library with both labeled proteins simultaneously.
Set up the FACS gates to collect cells that are Red-Positive and Green-Negative. This directly isolates specific binders in a single sort.
Effective sorting is a deliberate process, not a simple hunt for the brightest cells. By thoughtfully adjusting antigen concentration and gate shapes across multiple rounds, you can sculpt the library population with precision. Starting broad, progressively increasing stringency, and incorporating advanced methods like off-rate or specificity screens when needed will transform your surface display campaign from a game of chance into a robust engineering and discovery platform.
Image source: Walker, Laura & Bowley, Diana & Burton, Dennis. (2009). Efficient Recovery of High-Affinity Antibodies from a Single-Chain Fab Yeast Display Library. Journal of molecular biology. 389. 365-75. 10.1016/j.jmb.2009.04.019.
